
Table of Contents
- What Is a Roof Access Hatch and How Is It Used
- Why Insulation Matters in Cold Climates
- Understanding Roof Hatch Thermal Break Performance
- Heat Loss and Insulated Roof Hatch R-Value Standards
- Preventing Roof Hatch Condensation in Extreme Temperatures
- Air Leakage and Roof Access Hatch Sealing Techniques
- Selecting and Installing the Right Hatch for Your Climate
- Frequently Asked Questions
Last Updated: October 7, 2026
What Is a Roof Access Hatch and How Is It Used
A roof access hatch is a framed opening in a building's roof that provides safe entry and exit for maintenance, repairs, and inspections.
Facility managers and contractors use roof hatches daily to access HVAC systems, plumbing, electrical equipment, and roof-mounted units. Without proper access, routine maintenance becomes dangerous and time-consuming.
The real question isn't whether you need a hatch. It's whether you need an insulated roof hatch to protect your building's thermal envelope, a distinction that matters enormously when considering insulated roof hatches cold climates demand.

Why Insulation Matters in Cold Climates
In cold regions, heat escapes through every weak point in the envelope: walls, windows, and roof openings. An uninsulated hatch behaves like a permanently open door, bleeding warmth into freezing air.
In winter, the temperature difference between inside and outside can exceed 50 degrees Fahrenheit.
An insulated roof hatch breaks that thermal pathway. The insulation slows heat transfer, keeping interior surface temperatures closer to room temperature and reducing the workload on heating systems, which translates to lower utility expenses and more consistent indoor comfort in northern climates.

When an Insulated Hatch Is Essential, Advisable, or Optional
Most guidance stops at "insulation is good." The more useful answer is conditional. Use the criteria below to decide your building's category.
Essential (specify an insulated hatch):
- The space below the hatch is conditioned and occupied, and the hatch sits inside the building's thermal envelope.
- The building is in a cold climate zone (roughly zones 5 through 8 on the U.S. Department of Energy climate zone map), where design heating temperatures are low and the heating season is long.
- Indoor relative humidity is regularly elevated, such as in mechanical rooms, pool enclosures, commercial kitchens, or laundry areas, where a cold surface will condense.
- The hatch is large or accessed frequently, so the thermal penalty and the condensation exposure are continuous rather than occasional.
- Local energy code treats the hatch as part of the roof assembly and requires it to meet a minimum insulation value.
Advisable (insulated hatch is the better default):
- The space below is semi-conditioned, meaning it is heated but not to full occupied-space temperatures.
- The building is in a mixed climate where winter design temperatures still drop below freezing for extended periods.
- The hatch is small and accessed only a few times per year, but the roof assembly around it is insulated, so an uninsulated hatch would become the obvious thermal weak point.
Optional (uninsulated may be acceptable):
- The space below is unconditioned and ventilated to the outdoors, such as a detached storage building or an open parking structure, where there is no warm, humid air to condense and no conditioned load to protect.
- The climate is mild, with design temperatures that rarely fall below freezing.
- The hatch is a temporary or short-service-life installation where the thermal penalty is negligible.
The choice comes down to three variables: whether the space below is conditioned, how cold and how long the winter is, and whether moisture is present. When all three point toward a cold, conditioned, humid interior, insulation is not optional, it is the difference between a working thermal envelope and a permanent hole in it.
Understanding Roof Hatch Thermal Break Performance
A thermal break is a material or design feature that interrupts the path heat takes through a structure. In roof hatches, it separates the cold metal frame from the warm interior environment.
Without a thermal break, cold metal on the outside pulls heat from the interior.
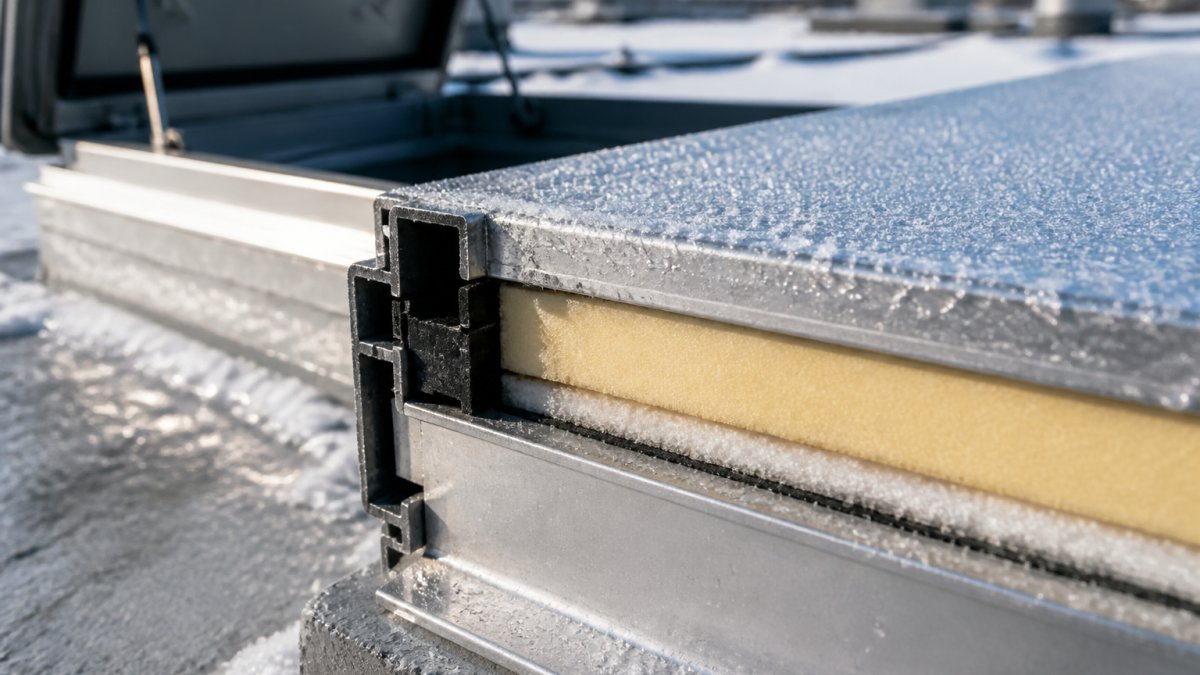
The difference is measurable: a hatch with a strong thermal break keeps interior surface temperatures closer to room temperature, preventing condensation on the inside of the lid.
Heat Loss and Insulated Roof Hatch R-Value Standards
R-value measures how well a material resists heat flow; higher R-values mean better insulation. For roof hatches, published R-values typically range from R-5 (minimal) to R-20 or higher (premium), depending on climate zone, roof assembly, and local energy code.
Buildings in northern climates should generally target R-10 to R-20 for roof hatches so the hatch does not become the weak point in an otherwise insulated roof. A practical comparison:
| Hatch Type | Typical R-Value | Best For | Cold-Climate Risk |
|---|---|---|---|
| Uninsulated metal | R-0 to R-2 | Mild climates, temporary access | High heat loss, condensation |
| Standard insulated | R-5 to R-10 | Moderate climates, occasional use | Moderate heat loss |
| Premium insulated | R-15 to R-20 | Cold climates, frequent access | Minimal heat loss |
How to Compare Hatch Insulation Performance
R-value alone is not enough to compare two hatches. The metric that governs heat loss is U-factor, the rate of heat transfer through the whole assembly, expressed in Btu per hour per square foot per degree Fahrenheit. U-factor is the reciprocal of R-value: a higher R-value means a lower U-factor, and a lower U-factor means less heat loss. When a manufacturer publishes only a panel R-value, ask for the U-factor of the complete hatch, that number predicts real performance.
Three factors determine whether the published rating matches installed performance:
- Thermal-break design. A full thermal break addresses the entire assembly rather than just the frame edges, which matters most in extreme cold.
- Frame and curb contribution. The curb, the frame, and the lid all conduct heat. A hatch with an excellent lid panel but an unbroken metal curb will still lose heat at the perimeter. Whole-assembly performance includes every conductive path, not just the insulated panel.
- Gasket and seal continuity. Air leakage bypasses insulation entirely. A hatch with a high panel R-value and a poor gasket will underperform a lower-rated hatch with a continuous, well-compressed seal.
Matching the Hatch to the Roof Assembly
Local building codes often specify minimum insulation values for roof penetrations. In cold climates, energy codes commonly require penetrations to match or exceed the surrounding roof assembly's insulation.
A useful rule of thumb: the hatch should not be the least-insulated element in the roof.
Victory Construction Products stocks hatches from multiple manufacturers in different R-value ranges. The Bilco Roof Hatch and Acudor Roof Hatch both offer insulated options with thermal breaks, allowing you to match hatch performance to your climate zone and building code requirements.
Preventing Roof Hatch Condensation in Extreme Temperatures
Condensation on roof hatches is a cold-climate problem that catches many facility managers off guard.
Over time, condensation causes rust, corrosion, and water stains, damages equipment stored near the hatch opening, and in worst cases drips into mechanical spaces, damaging HVAC or electrical systems.
An insulated roof hatch prevents this by keeping the interior surface warmer.

Prevention requires three steps:
- Install a hatch with adequate insulation (R-10 or higher in cold climates)
- Ensure proper air sealing around the frame to prevent warm, humid air from reaching cold surfaces
- Manage indoor humidity through ventilation and dehumidification in mechanical spaces
If condensation is already visible on an existing hatch, upgrading to an insulated model is the most reliable long-term fix. Temporary solutions like sealing gaps or adding surface treatments rarely solve the root problem.
Air Leakage and Roof Access Hatch Sealing Techniques
An insulated hatch with a poor seal defeats its own purpose.
Air sealing creates a tight barrier between the hatch and the roof opening. Quality hatches include gaskets, rubber or foam seals, around the frame perimeter and along the lid edges.
Installation quality matters enormously: a poorly installed hatch will leak regardless of its insulation rating. What to check:
- Gasket condition: Inspect rubber seals for cracks, compression set, or gaps
- Frame fit: The frame should sit flush against the roof curb with no visible gaps
- Lid closure: The lid should seat firmly and close smoothly without binding
- Fastener tightness: Bolts and fasteners should be snug but not over-tightened
Many buildings have older hatches with deteriorated gaskets. Replacing the gasket, a simple, low-cost fix, can restore air-sealing performance without replacing the entire hatch.
The Dur-Red Roof Hatch includes heavy-duty air-flow pressure intensifier controls and bulb-neoprene seals designed for tight weather sealing.
Selecting and Installing the Right Hatch for Your Climate
Choosing the right hatch requires matching three factors: climate severity, building code requirements, and access frequency.
Step 1: Determine your climate zone. The U.S. is divided into climate zones based on heating and cooling degree days. Check the U.S. Department of Energy climate zones map for your location.
Step 2: Review local building codes. Energy codes in cold climates often mandate minimum insulation values for roof penetrations.
Step 3: Select a hatch with appropriate insulation. For cold climates, choose R-10 or higher.
Step 5: Document and maintain. Keep records of the hatch model, R-value, and installation date. Inspect gaskets annually, especially in fall before winter arrives.
Many facility managers and contractors rely on Victory Construction Products for hatch selection and sourcing.
The Bottom Line
Insulated roof hatches cold climates require are essential for building performance.
The key is selecting a hatch with adequate R-value, proper thermal breaks, and reliable air sealing, then installing it correctly. When you're ready to source a hatch that meets your climate and code requirements, Victory Construction Products has the in-stock solutions and expertise to get your project moving. Browse our roof hatch options and get same-day shipping on most orders.
Frequently Asked Questions
Are insulated roof hatches necessary in cold climates?
Yes, in climates with winter temperatures below freezing, insulated roof hatches are essential. Uninsulated hatches create significant thermal bridges that allow heat to escape from the building interior, increasing heating demand and creating cold spots where condensation forms. An insulated roof hatch with proper thermal breaks and weather sealing reduces heat loss, prevents moisture damage, and maintains indoor comfort. Buildings in cold climates without insulated access hatches experience higher energy consumption and risk structural damage from condensation.
What R-value should an insulated roof hatch have?
Roof hatches in cold climates should have an appropriate R-value, depending on local building codes and climate severity. The R-value indicates how well the insulation resists heat transfer; a higher R-value means less heat loss through the hatch. Check your local building code for specific requirements in your area, as codes vary by region and building type.
What is a roof hatch thermal break and why does it matter?
A thermal break is a non-conductive material layer in the hatch frame that interrupts the direct path of heat transfer between the interior and exterior. Without a thermal break, metal frames conduct cold directly into the building, creating thermal bridges that cause significant heat loss and cold spots on the frame surface. Thermal breaks reduce this conductive heat transfer, improve indoor comfort, lower heating costs, and prevent condensation from forming on the hatch frame during cold weather. This feature is critical for maintaining building envelope performance in cold climates.
Can a poorly insulated roof hatch cause condensation and ice buildup?
Yes. When a roof hatch lacks proper insulation or thermal breaks, the frame and interior surface become cold enough to condense moisture from indoor air. This condensation can freeze in winter, creating ice buildup on the hatch and frame, which damages seals and allows water infiltration. Over time, repeated freeze-thaw cycles degrade the gasket and weatherstripping, compromising the air seal. Proper insulation, thermal breaks, and weather sealing prevent cold surfaces from forming and eliminate the conditions that cause condensation and ice damage.
How do you seal a roof access hatch to prevent air leakage?
Effective sealing requires multiple components: a high-quality gasket or weather seal around the frame perimeter, proper weatherstripping on the hatch lid, and a secure latch mechanism that compresses the seal when closed. During installation, ensure the hatch frame is properly aligned and fastened to the roof curb, and apply sealant around the frame-to-curb joint. Check that the gasket is intact and makes full contact when the hatch is closed. Regular maintenance, including gasket inspection and replacement if worn, maintains the air seal and prevents infiltration of cold air and moisture.