
Table of Contents
- Quick Comparison: 7 Commercial Roof Hatches for Flat Roofs
- 1. Bilco Roof Hatch: Best One-Hand Operation
- 2. Acudor Roof Hatch: Best Economical Steel Option
- 3. Dur-Red Roof Hatch: Best Heavy-Duty Weathertight Build
- 4. Elmdor Galvanized Steel Roof Hatch: Best for Cost-Saving Access
- 5. JL Industries Roof Hatch: Best Mid-Range Standard Fit
- 6. Lane-Aire Roof Hatch: Best for Code-Driven Ladder Access
- 7. Milcor Roof Hatch: Best Unobstructed Clear Opening
- How to Choose the Right Commercial Roof Hatch
- Installation Requirements for Flat Roofs
- Aluminum vs Steel Roof Hatches for Commercial Buildings
- Maintenance and Weatherproofing
- Frequently Asked Questions
Last Updated: September 14, 2026
Quick Comparison: 7 Commercial Roof Hatches for Flat Roofs
Choosing commercial roof hatches for flat roofs comes down to three variables: how the cover operates, what it is made of, and how well it keeps water out. This guide from Victory Construction Products compares seven models we stock, with real prices and trade-offs.
If you are specifying a roof access hatch for a flat commercial roof: Bilco leads on one-hand operation, Acudor on price, and Dur-Red on weathertight construction. Everything else is matching the hatch to your ladder, curb, and building code.
| Model | Price | Material | Best For |
|---|---|---|---|
| Bilco Roof Hatch | $1,480 | Galvanized steel, aluminum, or stainless steel | One-hand operation |
| Acudor Roof Hatch | $1,347 | Galvanized steel or aluminum | Economical steel option |
| Dur-Red Roof Hatch | $1,285 | 14-gauge galvanized steel or aluminum | Heavy-duty weathertight build |
| Elmdor Galvanized Steel Roof Hatch | $1,340 | Galvanized steel | Cost-saving access |
| JL Industries Roof Hatch | $1,300 | Steel | Mid-range standard fit |
| Lane-Aire Roof Hatch | $1,350 | Steel | Code-driven ladder access |
| Milcor Roof Hatch | $1,345 | Steel | Unobstructed clear opening |
A roof access hatch is a hinged, weatherproofed cover over a roof penetration that allows ladder or stair access to a flat roof from inside the building. Every model below meets that definition; what separates them is the hardware.

1. Bilco Roof Hatch: Best One-Hand Operation
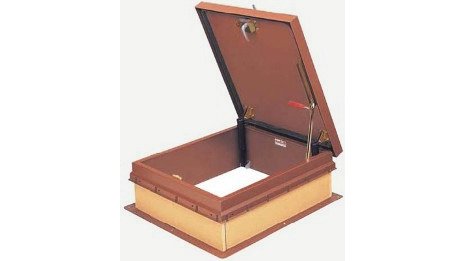
The Bilco roof hatch is the best pick where staff carry tools up the ladder: one-hand operation lets the user open or close the cover fully while keeping one hand on the ladder.

That feature is why it is specified on so many commercial flat roofing projects. Available in galvanized steel, aluminum, or stainless steel, it covers most service conditions. Trade-offs: the stainless option costs more, and freight shipping applies on larger sizes.
Pros: one-hand operation, three material choices, strong safety story Cons: premium price, freight required
2. Acudor Roof Hatch: Best Economical Steel Option
Acudor roof hatches are designed for convenient, economical access, making them the value pick when the spec calls for prime coated galvanized steel or aluminum.

The trade-off: safety, durability, and ease of operation at the lowest price here, but without the premium hardware and finish options of the Bilco line. It ships freight due to size, so factor that into delivered cost.
Pros: lowest price here, steel or aluminum, easy operation Cons: freight shipping, fewer finish options
3. Dur-Red Roof Hatch: Best Heavy-Duty Weathertight Build
Dur-Red builds its ladder hatch for absolute weather tightness. The curb, curb frame, and lid are 14-gauge galvanized steel or aluminum, fully welded and ground smooth.
The lid carries fiberglass insulation protected by a 22-gauge lid liner, and the assembly ships complete with 3/16-inch galvanized pivot hinges, inside and outside padlockable handles, and a bulb-neoprene seal. Specify it where membrane integrity and watertight performance decide the job.
Pros: welded construction, insulated lid, padlockable handles Cons: heavier unit, higher freight weight
4. Elmdor Galvanized Steel Roof Hatch: Best for Cost-Saving Access
Elmdor roof access hatches are engineered for durability and safety with ease of installation, secured from the base flange to the roof.
That base-flange detail matters on retrofit work: it lets a crew set the hatch over an existing opening without rebuilding the curb, keeping labor hours down. The galvanized steel construction suits general service access where corrosion resistance needs are moderate.
Pros: simple installation, cost-saving, accommodates ladder and stair access Cons: galvanized steel only, not for aggressive environments
5. JL Industries Roof Hatch: Best Mid-Range Standard Fit
JL Industries sits in the middle of this group on price, and that is where it earns its place: a clean selection when a spec calls for a standard-size hatch with no unusual requirements.
It is not the cheapest or the most heavily built, but it offers predictable fit on standard openings and straightforward ordering, useful when buying across multiple properties and repeating one model number.
Pros: mid-range price, standard sizing, easy to repeat across projects Cons: fewer standout features than the Bilco or Dur-Red units
6. Lane-Aire Roof Hatch: Best for Code-Driven Ladder Access
When architectural and building code requirements call for roof access via a ladder, the Lane-Aire standard roof hatch provides a practical, economical solution, the exact scenario it was designed around.
Lane-Aire builds it with safety, durability, and effortless operation in mind, and it holds up under normal access use. If your inspector wants a compliant ladder-access opening and you do not need premium hardware, this is the practical answer.
Pros: purpose-built for ladder access, economical, code-aligned Cons: standard access duty only, not for high-traffic roofs
7. Milcor Roof Hatch: Best Unobstructed Clear Opening
Milcor's clear hatch opening is virtually unobstructed, with only a narrow hold-open arm at one corner and the torsion bar or spring mounted out of the way in the cover or frame.
That matters when equipment has to pass through. Heavy, closed-cell rubber gaskets are factory-applied against weather and drafts, and latching devices with inside and outside handles hold the hatch tightly closed. Trade-off: the torsion mechanism needs periodic inspection.
Pros: maximum clear opening, factory-applied gaskets, secure latching Cons: mechanism requires scheduled inspection
How to Choose the Right Commercial Roof Hatch
Start with the opening, not the brand. Measure the existing curb or planned penetration, confirm whether access is by fixed ladder, ship stair, or service stair, and check local code for fall protection at the opening. Most specifiers who get this wrong picked a model number before measuring the curb.
Step 1: Lock the opening dimensions and access method
Measure the inside clear opening of the existing curb (or planned penetration) in both directions, then the curb height above the membrane. A hatch is ordered against those three numbers plus the access method. If the opening must pass a packaged rooftop unit, motor, or pump, size to the largest object plus rigging clearance, not a catalog size. Standard commercial sizes cover most ladder access; mechanical replacement work is where custom clear openings earn their cost back.
Step 2: Match the material to the roof environment
- Aluminum: resists corrosion, weighs less, easier for one person to handle on a roof. Best for coastal, humid, or chemically exposed roofs.
- Galvanized steel: lower material cost, performs well in ordinary inland service. The default when budget drives the decision.
- Stainless steel: reserved for aggressive environments where neither aluminum nor galvanized steel holds up. Expect the highest unit price and the longest lead time of the three.
Choose based on the roof environment, not habit. A galvanized hatch on a coastal roof is a warranty claim waiting to happen.
Step 3: Confirm operation and fall protection
Spring-assisted or counterbalanced covers matter if one person will open the hatch while holding a ladder. Where the opening is regularly used, pair the hatch with a fixed railing system, the railing is the fall protection, not the hatch. The OSHA walking-working surfaces standard for ladder safety systems is the governing reference for fall protection at roof openings.
Step 4: Run the total cost of ownership, not the sticker price
This is the step most buyers skip, and where the real money sits. A roof hatch is a 20-to-30-year asset, so purchase price is a small fraction of lifetime cost. Build the comparison on four lines:
- Unit price, the number on the quote.
- Freight, most commercial hatches ship freight due to size. Two hatches ordered together usually beat two separate freight charges.
- Installation labor, a base-flange design that sets over an existing curb can save a crew hours versus rebuilding a curb. On retrofit work, that labor delta often exceeds the price gap between two competing models.
- Maintenance and replacement, gaskets, hinge lubrication, and hold-open mechanism inspection recur every year. A hatch that seals tight and uses a standard gasket is cheaper to own than one with a proprietary seal.
A common pattern among multi-property facility managers: the cheapest unit on the quote is rarely the cheapest over ten years once freight, curb rework, and gasket replacement are added. Run the four lines before awarding the order.
Step 5: Verify load capacity and insulation against the spec
Confirm the structural load capacity of the curb and lid against your project spec, and the lid insulation value if the opening sits over conditioned space. An insulated lid liner supports energy efficiency and reduces condensation, a detail that matters more in cold climates.
Installation Requirements for Flat Roofs
Installation requirements for a commercial roof hatch on a flat roof begin with a properly flashed curb. The hatch mounts to the curb, and the curb carries the flashing that ties into the membrane. The sequence is the same on new construction and retrofit work, but the risk profile is not.
The five-step install sequence
- Frame and secure the roof curb to the structural deck.
- Set the hatch over the opening and fasten through the base flange.
- Flash the curb to the roof membrane to preserve the watertight seal.
- Verify the cover operates freely through its full swing.
- Confirm the locking handle and safety latch engage correctly.
New construction: build the curb into the roof package
On new construction, the curb is typically framed or poured as part of the roof package, and the roofing contractor flashes it during the membrane install. The hatch is set after the membrane is complete. Sequence delivery before the roofing crew demobilizes, a hatch arriving after the membrane is finished means a billed return trip to flash the curb.
Retrofit: protect the membrane, or you own the leak
Retrofitting a hatch into an existing flat roof is the harder case, and the one most guides skip. The membrane is already in service, and every cut is a future leak point if the flashing detail is wrong. Three approaches cover most retrofit work:
- Replace over an existing curb. If a hatch is already there and the curb is sound, a replacement hatch designed for existing curbs lets you swap the unit without disturbing the membrane. Remove the cover from the damaged unit and set the new hatch on the existing curb. This is the lowest-risk retrofit because the membrane is never opened.
- Cut a new opening into an existing membrane. This requires cutting the membrane back, framing the new curb to the deck, then re-flashing the curb and tying the membrane back in with a compatible detail. The membrane must be clean and dry at the tie-in, and the flashing must match the existing membrane material, a modified-bitumen detail on a TPO roof will not hold.
- Add a curb on top of the membrane. Used where the deck cannot be opened. The curb sits on the membrane and is flashed at its base. This is the fastest option and the one most dependent on the quality of the base flashing, because the entire watertight seal is at the curb-to-membrane joint.
On any retrofit, the base-flange design of the Elmdor unit and the Bilco VersaMount replacement hatch earn their keep: both let a crew set the hatch over an existing opening without rebuilding the curb, keeping labor hours and membrane risk down.
Flashing details that decide whether the opening leaks
- Flash the curb to the membrane with a continuous, fully adhered detail, no mechanical fasteners penetrating the membrane inside the field.
- Terminate the membrane at least 8 inches above the roof surface on the curb, or per the membrane manufacturer's published detail, whichever is greater.
- Seal all fastener heads and curb corners with the membrane manufacturer's approved sealant.
- Do not rely on the hatch gasket alone to keep water out. The gasket seals the cover to the frame; the flashing seals the curb to the roof. They are two separate systems.
Post-install verification
After the hatch is set and flashed, operate the cover through its full swing, confirm the hold-open arm engages, test the locking handle and safety latch, and check the gasket seal against the frame. Photograph the flashing detail, that record is what a facility manager needs when the roof warranty is questioned years later.
Aluminum vs Steel Roof Hatches for Commercial Buildings
Aluminum vs steel roof hatches for commercial buildings comes down to environment and weight. Aluminum resists corrosion and is lighter to handle; galvanized steel costs less and performs well in ordinary service conditions.
Choose aluminum for coastal, humid, or chemically exposed roofs; galvanized steel when budget and standard service conditions drive the decision. Stainless steel is reserved for aggressive environments where neither holds up.
Maintenance and Weatherproofing
Maintenance is where most roof hatch problems start, and it is almost always the gasket. Inspect the seal and hinge mechanism at least twice a year, and clear debris from the curb and flashing.
- Check the gasket for cracking or compression set and replace as needed.
- Lubricate the hinge mechanism and the hold-open arm.
- Test the locking handle and safety latch for positive engagement.
- Inspect curb flashing and reseal any lifted membrane.
- Confirm the cover seals tight against drafts and driving rain.
A hatch that no longer seals is a roof penetration that leaks. Catching a worn gasket early is far cheaper than repairing saturated insulation later.
Frequently Asked Questions
What are the OSHA requirements for commercial roof hatches?
OSHA 29 CFR 1910.23 requires that any roof hatch opening be guarded with a railing, a cover, or a removable guardrail system when employees work near it. Hatch covers must be capable of withstanding a 200-pound load, and ladder access openings need a swing gate or offset to prevent falls. A fixed hatch railing system like the Bil-Guard meets and exceeds these rules, giving you a permanent fall protection barrier around the opening.
What is the difference between aluminum and steel roof hatches?
Aluminum hatches resist corrosion and weigh less, which makes them easier to operate and suited to coastal or humid environments. Galvanized steel costs less upfront and handles heavy foot traffic, but it can rust if the coating is scratched. For most commercial buildings, the choice comes down to climate exposure, structural load capacity, and whether you need a lighter cover for one-hand operation. Both are available in the same opening sizes.
How do I choose the right size roof hatch for a flat roof?
Measure your ladder or stair access point and confirm the clear opening needed for equipment or personnel. Standard commercial sizes run 24 x 36 inches up to 36 x 48 inches, and the hatch must match your roof curb dimensions for a watertight seal. If you carry tools or replacement parts to the roof, size up to the larger opening. Always verify the structural load capacity of the roof structure before adding a heavier hatch.
Are roof hatches required to be fire-rated?
Roof hatches are not automatically fire-rated, but building codes may require a fire-rated assembly if the hatch sits in a rated roof or floor-ceiling assembly. Some models double as automatic fire vents, which open under heat to release smoke and gases. Check your local code official and the spec for your building envelope. If fire rating is required, the hatch must carry the correct UL listing for that assembly.
How often should commercial roof hatches be inspected?
Inspect roof hatches at least twice a year and after any severe storm. Check the gasket for cracking, the hinge mechanism for smooth spring-assisted operation, and the locking handle and safety latch for proper engagement. Clear debris from the curb flashing and confirm the watertight seal around the roof penetration is intact. A yearly inspection service keeps the hatch compliant with OSHA guardrail rules and protects your roof membrane integrity.